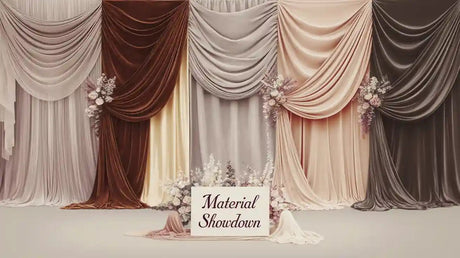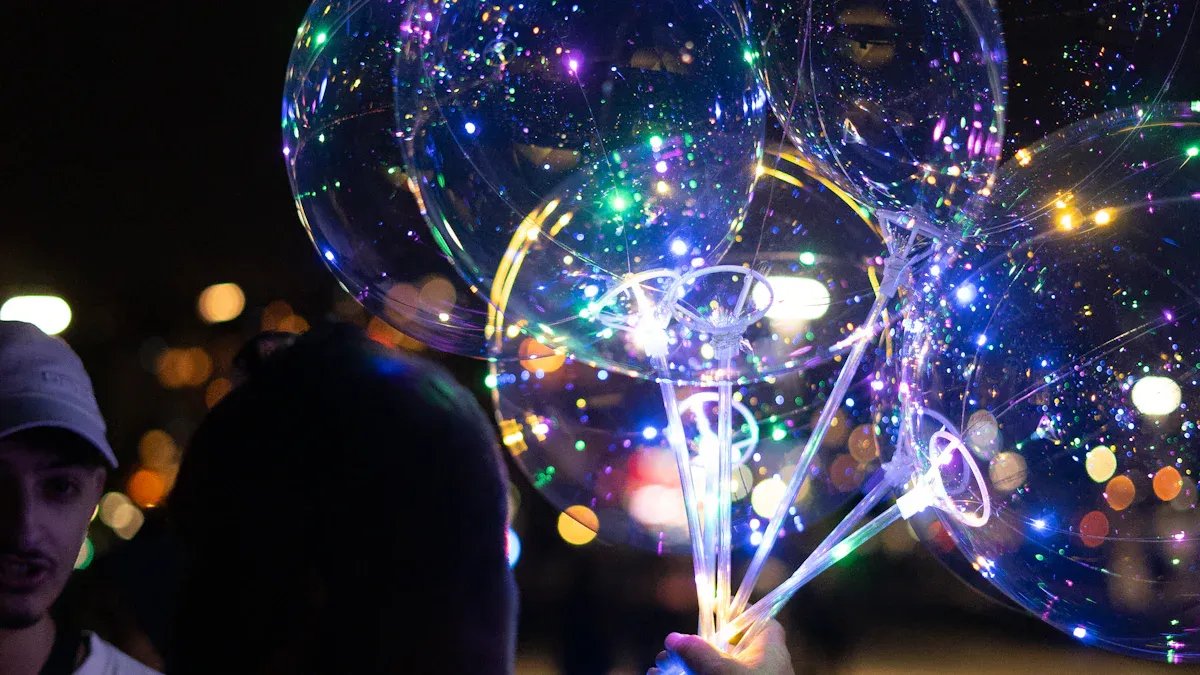
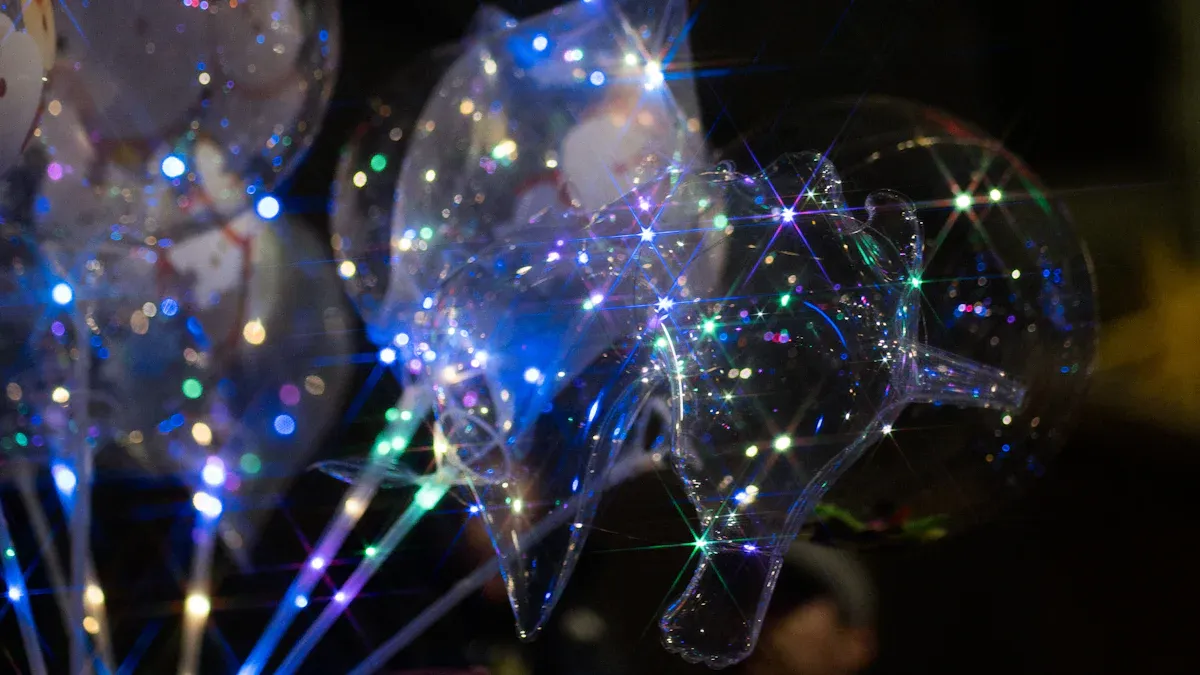
Imagine stepping into a room where glowing balloons drift like stars in the night sky. LED-lit clear balloons create this enchanting atmosphere effortlessly. Perfect for weddings, parties, anniversaries, or romantic occasions, these clear balloons can be used as stunning table decorations or left to float gracefully above. Their gentle glow adds a touch of magic, making any event feel extraordinary. The best part? They’re easy to assemble, allowing you to bring this magical charm to your events with minimal effort.
Key Takeaways
Get all your supplies ready first. You’ll need clear balloons, LED lights, a helium tank or air pump, and other items. Being prepared makes things easier.
Pick light LED lights for helium balloons. Heavy lights can stop balloons from floating well, so use lightweight, energy-saving ones.
Stretch the balloons before blowing them up. This makes them inflate easily and lowers the chance of popping, especially with helium.
Spread the LED lights evenly on the balloon. This gives a neat look and makes the glow even all around.
Check the LED lights before putting them on. This quick step saves time and makes sure your balloons shine brightly at the event.
Materials for LED-Lit Clear Balloons
Before making your glowing balloons, gather all the needed supplies. Here’s a list of what you’ll need to make them shine and float.
Clear balloons
The main item is the clear balloon. These see-through balloons let the lights inside glow brightly. Choose strong, good-quality latex or mylar balloons. Latex balloons are stretchy and simple to use. Mylar balloons look shiny and smooth. Fun fact: Mylar balloons are popular because people love customizing them for parties. This trend is becoming more common!
If you care about the environment, pick biodegradable latex balloons. Many people now prefer eco-friendly party supplies. Companies like Huhtamaki are even making more green products to meet this demand.
LED string lights or balloon lights
Next, you’ll need lights to make your balloons glow. Small LED lights work great because they’re light, save energy, and come in many colors. You can wrap LED string lights around the balloon or use balloon lights that fit inside.
Pick battery-powered lights for easy use. This way, you don’t need a plug. Lightweight lights also help helium-filled balloons float better.
Helium tank or air pump
To make your balloons float, use helium. A small helium tank is simple to use and can fill several balloons. If you don’t want floating balloons, an air pump works too. Just add balloon sticks or weights to keep them steady.
Tip: Don’t overfill helium balloons. This keeps them from popping and helps them last longer at your event.
Balloon sticks or weights
If you’re not using helium, you’ll need something to keep your balloons in place. Balloon sticks are a great option. They’re lightweight, easy to handle, and perfect for creating a fun display. You can hold the stick or place it in a vase for a centerpiece. Balloon sticks usually come with a small cup at the top to secure the balloon. Just slide the balloon’s neck into the cup, and you’re good to go.
Weights are another option, especially if you’re using helium. They keep your clear balloons from floating away. You can find balloon weights in different shapes and colors to match your event’s theme. For a DIY touch, tie the balloon string to a small bag of candy or a decorative stone. It’s a simple way to add a personal touch to your decorations.
Tip: If you’re using helium, make sure the weight is heavy enough to hold the balloon down. Test it before your event to avoid surprises.
Transparent tape or balloon clips
To secure the LED lights to your balloons, you’ll need transparent tape or balloon clips. Transparent tape works well because it’s nearly invisible. Use small pieces to attach the lights to the balloon without making it look messy. Place the tape evenly around the balloon to keep the lights in place.
Balloon clips are another handy tool. They’re designed to hold the balloon’s neck tightly, sealing it without the need for knots. Some clips even have hooks for attaching strings or lights. They’re a lifesaver if you’re short on time or want a clean, professional look.
Note: Avoid using too much tape, as it can weigh the balloon down or make it look cluttered.
Scissors
A good pair of scissors is essential for this project. You’ll need them to cut the LED string lights, tape, or balloon ribbons to the right length. Sharp scissors make the job easier and help you avoid frayed edges. Keep them handy throughout the process, as you’ll likely need them more than once.
Safety Tip: Always handle scissors carefully, especially if kids are helping with the balloons. Store them out of reach when not in use.
Batteries for LED lights
You’ll need batteries to power your LED lights. Picking the right ones makes sure your balloons shine brightly. Most LED lights use small batteries like AA, AAA, or button cells. These batteries are easy to find and simple to use.
For longer-lasting power, try lithium batteries. They are strong and work well for a long time. Experts say they are safe and great for LED lights. Lithium batteries also keep their charge longer, so your balloons won’t dim during the party.
Check your LED lights to see which batteries they need. Some lights need specific types or voltages. Using the wrong battery can make the lights dim or break them. Always read the instructions before buying batteries.
Tip: Test your batteries before putting them in the balloons. Turn on the lights to make sure they work. If you’re using many balloons, keep extra batteries nearby. You might need replacements during the event.
When done, recycle old batteries properly. Many stores and centers take used batteries. This helps protect the planet. With the right batteries, your glowing balloons will look amazing and light up your event!
How to Make LED-Lit Clear Balloons
Step 1: Gather all materials
Before you start, make sure you have everything you need. Having all your materials ready will save you time and keep the process smooth. Refer to the materials list above and double-check that you’ve got clear balloons, LED lights, a helium tank or air pump, balloon sticks or weights, transparent tape, scissors, and batteries.
Pro Tip: Test your LED lights before you begin. Turn them on to ensure they’re working properly. This will save you from any last-minute surprises during assembly.
Step 2: Stretch and inflate the clear balloon
Take one of your clear balloons and gently stretch it with your hands. This step helps the balloon expand more easily when you inflate it. Stretching also reduces the chances of the balloon popping, especially if you’re using helium.
Once stretched, use your helium tank or air pump to inflate the balloon. If you’re using helium, stop inflating once the balloon feels firm but not overfilled. Overinflating can cause the balloon to burst, which is the last thing you want when preparing for events or parties. If you’re using an air pump, inflate the balloon to your desired size and set it aside.
Safety Note: Always follow the instructions on your helium tank or air pump. Keep children away from the equipment while inflating the balloons.
Step 3: Insert or attach the LED lights
Now comes the fun part—adding the lights! If you’re using balloon lights, turn them on and carefully insert them into the balloon through the neck. Push them gently to avoid damaging the balloon. For LED string lights, you’ll need to wrap them around the outside of the balloon.
Start at the neck of the balloon and work your way up, wrapping the lights evenly. Use small pieces of transparent tape to secure the lights in place. Make sure the tape is barely visible to maintain a clean look. Distribute the lights evenly to create a beautiful glowing effect that will wow your guests.
Quick Tip: If you’re using helium-filled balloons, opt for lightweight LED lights. Heavier lights can weigh the balloon down, preventing it from floating properly.
Step 4: Secure the LED lights around the balloon
Once you've wrapped the LED lights around the balloon, it's time to secure them in place. This step ensures the lights stay evenly distributed and don’t shift during your event.
Here’s how you can do it:
Use transparent tape: Cut small pieces of tape and gently press them onto the balloon where the lights touch. Place the tape at regular intervals to keep the lights steady.
Avoid over-taping: Too much tape can make the balloon look messy or weigh it down. Stick to just enough to hold the lights securely.
Check the balance: After taping, hold the balloon up and check if the lights are evenly spaced. Adjust if needed to create a polished, glowing effect.
Pro Tip: If you’re using helium-filled balloons, make sure the tape is lightweight and minimal. Heavy tape can prevent the balloon from floating properly.
Step 5: Inflate with helium or air
Now it’s time to bring your balloon to life! Inflate it with helium if you want it to float or use an air pump if you prefer it to stay grounded.
For helium balloons: Attach the balloon’s neck to the nozzle of your helium tank. Slowly release the helium while holding the balloon securely. Stop inflating when the balloon feels firm but not overly tight.
For air-filled balloons: Use an air pump to inflate the balloon to your desired size. If you’re inflating by hand, take breaks to avoid overexertion.
Safety Note: Always follow the instructions on your helium tank or air pump. Keep the equipment away from children and store it in a safe place after use.
After inflating, tie the balloon’s neck securely or use a balloon clip to seal it. This step ensures the air or helium stays inside, keeping your balloon inflated for hours.
Step 6: Attach balloon sticks or weights
If you’re not using helium, balloon sticks are a great way to display your creations. They’re easy to handle and perfect for table centerpieces or handheld decorations.
Attaching to sticks: Slide the balloon’s neck into the small cup at the top of the stick. Make sure it’s snug and secure. You can also add a decorative ribbon for extra flair.
Using weights: For helium-filled balloons, tie the string to a balloon weight. Choose weights that match your event’s theme, like colorful shapes or elegant designs.
Creative Idea: Want a personal touch? Use small bags of candy or decorative stones as weights. They’ll add charm and double as party favors!
Once attached, arrange your LED-lit balloons around the venue. Whether they’re floating or standing tall on sticks, they’ll create a magical atmosphere that your guests will love.
Step 7: Test and adjust the lights
Now that your LED-lit clear balloon is assembled, it’s time to test and fine-tune the lights. This step ensures your balloon glows beautifully and performs well throughout your event. Don’t skip this part—it’s the key to achieving that magical effect!
Why testing matters
Testing the LED lights after assembly helps you catch any issues early. Sometimes, lights may not work as expected due to temperature changes or uneven placement. By testing, you can ensure the lights meet your expectations and shine consistently.
Here’s what you should check:
Brightness: Are the lights glowing brightly? Dim lights might indicate low battery power or improper connections.
Even distribution: Look at the balloon from all angles. Are the lights evenly spaced, or do some areas look darker?
Stability: Gently shake the balloon. Do the lights stay in place, or do they shift around?
Quick Tip: If you notice uneven lighting, adjust the placement of the LED string or balloon lights. Use small pieces of tape to secure them in the right spots.
How to adjust the lights
If something doesn’t look right, don’t worry! Small tweaks can make a big difference. Follow these steps to adjust the lights:
Turn off the lights: Before making any changes, switch off the LED lights to avoid damaging them.
Reposition the lights: If some areas look dim, move the lights closer together. For brighter spots, spread them out evenly.
Secure loose sections: Use transparent tape to hold any loose parts in place. Make sure the tape doesn’t weigh down the balloon.
Test again: Turn the lights back on and check your adjustments. Repeat the process until the balloon looks perfect.
The importance of performance testing
LED lights are sensitive to factors like temperature and placement. Testing ensures they perform well under different conditions. Industry standards, such as NEMA SSL3-2010, emphasize the need for consistent performance validation. By testing your lights, you can avoid surprises and create a stunning display that lasts all night.
Pro Tip: Keep extra batteries on hand. If the lights dim during your event, a quick battery swap will bring them back to life.
Once you’re satisfied with the look, your LED-lit clear balloon is ready to shine! Place it in your venue and watch as it transforms the space with its magical glow.
Tips for Perfect LED Balloons
Pick strong clear balloons to avoid popping
Using tough balloons is important for LED light displays. You don’t want them bursting during your event. Choose clear balloons made from durable materials. Latex balloons are stretchy and less likely to pop if inflated correctly. Mylar balloons are shiny and tear-resistant, making them another great option.
For outdoor events or long celebrations, thicker balloons work best. They handle temperature changes and small bumps better than thin ones. These balloons will keep your LED lights glowing all night without trouble.
Pro Tip: Stretch the balloon gently before inflating. This helps prevent popping and makes it easier to inflate.
Choose lightweight LED lights for floating balloons
Light LED lights are better for helium balloons. Heavy lights can make balloons sink or lose balance. Lightweight LEDs keep them floating and looking great.
Here’s a table comparing LED light weights:
Model |
Weight (kg) |
|---|---|
30A |
0.49 |
45A |
0.64 |
60A |
0.88 |
90A |
1.38 |
Models like 30A and 45A are perfect for helium balloons. They’re easy to use and keep balloons floating well.
Lightweight LEDs are also portable and energy-saving. They’re simple to set up and shine brightly for hours.
Quick Tip: Test the lights before attaching them. This ensures they work and saves time during setup.
Stretch balloons before adding lights
Stretching balloons makes them flexible and less likely to tear. This step is helpful when using LED string lights inside. Stretching reduces pressure points and keeps the balloon intact.
Studies show stretching helps balloons handle stress better. Pre-stretched balloons inflate easily and fit lights without problems.
To stretch, hold the balloon’s neck and pull gently in all directions. A few stretches make the material softer and easier to work with. After stretching, the balloon inflates smoothly and holds lights securely.
Pro Tip: Stretching also helps helium balloons float longer by holding the gas better.
Distribute LED lights evenly for a polished look
Evenly distributing LED lights around your balloon is the secret to achieving that professional, polished look. When the lights are spaced out properly, they create a smooth, glowing effect that’s easy on the eyes and visually stunning. Uneven placement, on the other hand, can lead to harsh spots or dim areas, which might take away from the magic of your display.
To get that perfect balance, follow these simple tips:
Start at the base: Begin wrapping the LED string lights at the neck of the balloon. This gives you a stable starting point.
Work your way up: Wrap the lights in a spiral pattern, moving upward toward the top of the balloon.
Keep the spacing consistent: Leave equal gaps between each loop of the string lights. This ensures the glow is evenly spread.
Secure as you go: Use small pieces of transparent tape to hold the lights in place. This prevents them from shifting and keeps the design neat.
Why does even distribution matter? It’s all about creating a seamless, polished appearance. Think of it like painting a wall—you wouldn’t leave some areas bare while overloading others with paint. Similarly, evenly spaced lights ensure your balloon glows beautifully from every angle.
Experts in lighting design often use LED profiles to achieve this effect. These profiles include diffusers that turn harsh light into a soft, uniform glow. By mimicking this approach, you can elevate your balloon’s look and make it the star of your event.
Quick Tip: Step back and look at your balloon from a distance after wrapping the lights. This helps you spot any uneven areas and make adjustments before securing everything in place.
Test LED lights before assembly
Before you start assembling your LED-lit balloons, always test the lights. This step might seem small, but it can save you a lot of time and frustration later. Imagine finishing your balloon only to realize the lights don’t work—talk about a party foul!
Testing your LED lights ensures they’re functioning properly and ready to shine. Here’s how you can do it:
Turn on the lights: Check if they light up evenly and brightly. Dim or flickering lights might mean the batteries need replacing.
Inspect for damage: Look for any frayed wires or loose connections. These can cause the lights to fail during your event.
Test all functions: If your lights have multiple modes (like flashing or steady glow), cycle through them to make sure everything works.
Quality assurance tests, like function tests and assembly checks, are common in the lighting industry. These tests verify that products operate as intended and meet safety standards. By testing your lights, you’re essentially doing your own mini quality check.
Pro Tip: Keep a few extra batteries on hand. If a light stops working during your event, a quick battery swap can save the day.
Once you’ve confirmed the lights are in perfect condition, you’re ready to move on to the fun part—assembling your glowing masterpiece!
Troubleshooting LED-Lit Balloons
Preventing balloon popping during inflation
Popping balloons can be frustrating, especially when you're excited to see your glowing creations come to life. To avoid this, always stretch the balloon before inflating it. This makes the material more flexible and less likely to tear. When using helium or an air pump, inflate the balloon slowly. Keep an eye on its size and stop as soon as it feels firm. Overinflating is one of the main reasons balloons pop.
If you're working with LED lights inside the balloon, handle it gently. The lights can create pressure points, so make sure they’re evenly distributed. For outdoor events, avoid inflating balloons too much, as heat can cause the air or helium to expand and burst the balloon.
Tip: Use high-quality balloons made from durable materials. They’re less likely to pop and can hold the lights securely.
Fixing non-functional LED lights
Nothing’s worse than assembling your balloon only to find the LED lights don’t work. Before you start, test the lights by turning them on. If they don’t light up, check the batteries. Sometimes, replacing them solves the problem. If the lights still don’t work, inspect the wires for damage or loose connections.
For string lights, make sure the bulbs are securely attached. A loose bulb can break the circuit and stop the lights from working. If you’re using balloon lights, ensure they’re properly activated. Some models require a twist or press to turn on.
Quick Fix: Keep extra batteries and a backup set of lights handy. This way, you can quickly replace any faulty ones without delaying your setup.
Ensuring balloons float with helium
If your helium-filled balloons aren’t floating, the problem might be the weight of the LED lights. Lightweight lights are essential for keeping the balloon airborne. If the lights are too heavy, the balloon won’t lift, no matter how much helium you use.
Another common issue is underinflation. Make sure you’re filling the balloon with enough helium to counterbalance the weight of the lights. However, don’t overdo it, as this can cause the balloon to pop. If you’re still having trouble, check for leaks in the balloon. Even a tiny hole can let helium escape and prevent the balloon from floating.
Pro Tip: Use a helium-grade balloon and test its floating ability before attaching the lights. This ensures your balloon will stay aloft throughout your event.
Securing lights to prevent slipping
Keeping the lights in place on your balloon is crucial for that polished, magical look. If the lights shift or slip, it can ruin the even glow you worked so hard to create. Luckily, there are a few simple tricks to keep everything secure.
Use transparent tape: Small pieces of tape work wonders. Place them at regular intervals where the lights touch the balloon. This keeps the lights steady without adding too much weight.
Try balloon clips: These handy tools can hold the neck of the balloon tightly while also securing the lights. Some clips even come with hooks, making it easier to attach strings or ribbons.
Double-check the balance: After securing the lights, hold the balloon upright and give it a gentle shake. If anything feels loose, add another piece of tape or adjust the placement.
Pro Tip: Avoid over-taping. Too much tape can make the balloon look messy or weigh it down, especially if you’re using helium.
By taking these steps, you’ll ensure your LED-lit balloon stays picture-perfect throughout your event.
Addressing quick deflation issues
Nothing’s more disappointing than a balloon that deflates too quickly. If this happens, don’t worry—you can fix it! Start by checking the balloon for tiny holes or leaks. Sometimes, even a small puncture can cause the air or helium to escape. You can find leaks by gently pressing the balloon and listening for a hissing sound.
If you’re using helium, make sure the balloon is tied or clipped tightly at the neck. A loose seal is a common reason for quick deflation. For air-filled balloons, ensure the knot is secure or use a balloon clip for extra protection.
Quick Tip: Store inflated balloons in a cool, dry place. Heat can cause the air or helium to expand, leading to leaks or bursts.
Using high-quality balloons also helps. Durable materials hold air or helium longer, keeping your glowing masterpiece intact for hours. With these tips, your LED-lit balloons will stay vibrant and ready to impress your guests.
Making LED-lit clear balloons is simple and fun. The process is enjoyable, and the glowing balloons will impress your guests. These bright decorations can turn any event into something special. Whether it’s a wedding, party, or a casual get-together, they bring a magical touch everyone will admire.
Why not try it yourself? This guide gives you all the steps to create your own glowing balloons. Start now and make your next event truly memorable!
FAQ
How long do LED-lit balloons last?
LED-lit balloons can last up to 8 hours, depending on the quality of the balloon and the battery life of the lights. For longer events, keep spare batteries handy to replace them if needed.
Can I use regular balloons instead of clear ones?
Regular balloons work, but clear balloons are better. They let the LED lights shine through, creating a glowing effect. If you use opaque balloons, the lights won’t be as visible.
Are LED-lit balloons safe for kids?
Yes, they’re safe when assembled properly. Use durable balloons and secure the lights tightly. Keep scissors and batteries out of reach during assembly. Supervise kids if they’re helping.
Do I need helium for LED-lit balloons?
Helium isn’t required. You can use an air pump and attach balloon sticks or weights to display them. Helium is great for floating balloons, but air-filled ones work just as well for decorations.
Can I reuse the LED lights?
Absolutely! Carefully remove the lights after the event and store them for future use. Replace the batteries if needed, and they’ll be ready for your next celebration.